


Next Day Delivery Available

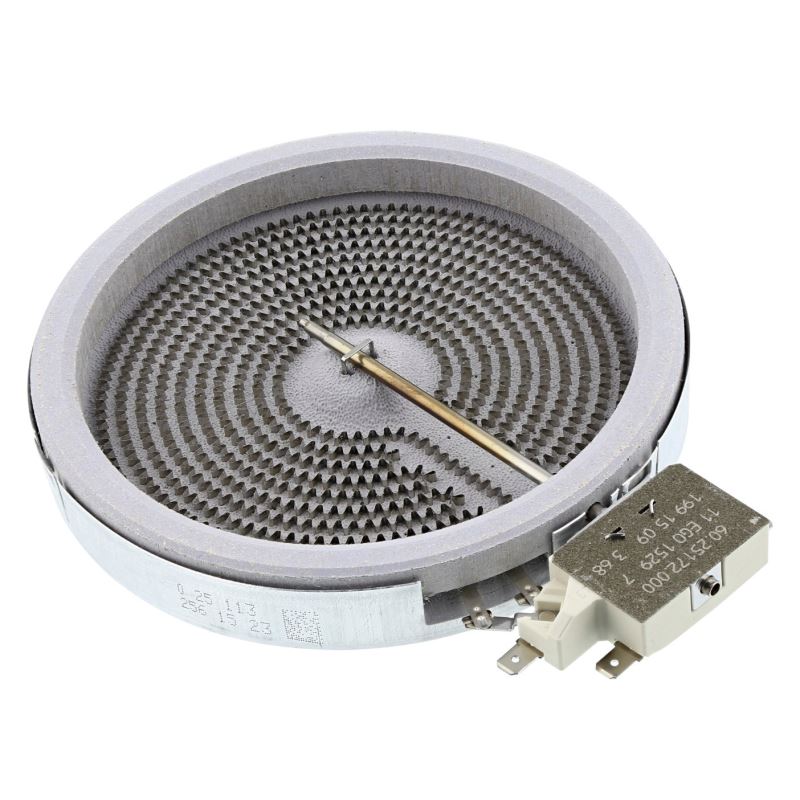
Tricity Bendix Oven Ceramic Hotplate Element 1200W 140Mm
Suitable For Models Of: AEG, Electra, Electrolux, Parkinson Cowan, Tricity Bendix, Westinghouse, Zanussi Cookers & Hobs Read More
£40.95


Will This Part Fit My Appliance?
Choose your brand from the list below to check your model compatibility.
Start typing your model number below to check compatibility.
 Part is compatible with
  We are unable to confirm if this part will fit with model number ""
Description
Manufacturers Part Number:
- 3740635226
Alternative Part Numbers:
- 3051740037
- 3113369007
- 3113399004
- 3740635028
- 3740635226
- 3740635523
- 3742938040
- 3890700028
- 3890700226
- 3890700325
EAN Number:
- 7321429842686
Latest Product Review(s)
2 Customer Review(s)
Electrolux Insight Hotplate - All Working Again !!!
Electrolux Insight / EKC6044W After speaking with Jack via email to qualify the correct hotplate element, fantastic assistance was received and the correspondence was very prompt & professional... BRILL - The element once hooked up worked a treat, it appears to heat up somewhat quicker than the old one. NOTE - The only thing noticed was the element has been made somewhat differently. While the element is switched off all is good. When turned on, as it heats up it looks visually different, that's all. No detrimental effect, just a visual difference, just wanted to point this out...!!! As our cooker is quite a few years old, we were pleased to able to get the hotplate working. We can live with it looking different when on... *** In fact my partner says it looks better and wants the other 3 hotplates replaced... My answer "When they fail" haha INSTALLATION - Just a little about the installation, I watched several videos over the internet, and most just show for ceramic hotplate cookers, the glass top comes off with a few screws, and the hotplates are then accessible, suspended, and able to be replaced - Not this version of the Electrolux Insight - The version of Insight I have is different, and a little fiddly so a bit of info, just so you know. The screws that hold the glass on are located side and front with the glass door for the grill down, for the last 3 screws. Once the screws are removed, the glass top only moves a little. It has to be moved forward and sort of unlooked. All the wiring for the switches, knobs, etc, is holding it back, there are also some cable ties to snip and replace later. The wiring needs to be disconnected from switches to get a bit more access. *** The ceramic elements in this case a suspended with brackets attached to the glass. Without all wiring disconnected, you would be unable to remove the glass, from the cooker. You can visually see this when you lift the glass slightly and look under the glass from each side on screw removal, be careful... Me, I managed to lift the glass and removed the wiring as needed. I lifted the glass at an angle and suspended it. I proceeded to work on replacing the ceramic element while still in place... It is also worth noting, the wiring appears somewhat of a different layout, but the pins are labeled and should be reconnected as is 1a,1b,2a,2b. Also, Note - The little brackets that come off the old element, have to be replaced in the same location in the replacement element, there are numbers, not the same numbers on a clock face, but it sort of looks like it, make note, make pictures at every stage, it will help... I spent many years in the motor trade and so my technical abilities are good... I would say this job is not hard if time is taken, but if you question your abilities in any way, this is not as straightforward as you might think, so get in a professional. My honest opinion. You will now once you have removed the screws and lifted the glass ever so slightly up, you at that point can see the job it entails, at this point we all know our own limits - Good luck to all...
By Paul C - East Riding of Yorkshire
27th Oct 2022
Watch connections
The 1b and 2a terminals on this unit are on diagonally opposite corners of the terminal block compared to the original unit I was replacing. I first connected the unit to match the terminal layout on the original. When I powered up the cooker at the wall switch the ring came on at full power and could not be controlled by the regulator dial. That's when I realised there must be something different about the terminal arrangement and found that 1b and 2a were transposed. Connecting the 1b and 2a wires to the same labelled terminals on the new unit solved the problem. However, it was fortunate the original wires had enough length to reach the terminals. So, before fitting check the terminal labels, they are stamped on the metal casing of the unit.
By John Pyper - Perth
31st Aug 2018
